How to voiceover a YouTube video like a pro
A YouTube voiceover may sound like a simple thing to just throw together. You just talk while a video is playing, right?
Well, although that may be true, there’s a subtle art behind creating the perfect voiceover. Get it right and you can revolutionise your content and help maintain and grow your audience. Get it wrong and people switch off.
Throughout this article we will not only explain why a voiceover is an important skill to master, we will also share our favourite voiceover hacks, tools and programs. Don’t worry, we’ll cover how you can record audio as you record video too – perfect for gamers!
So, get settled and prepare to have your eyes opened to how you can voiceover a YouTube video like a pro.
What is a voiceover and why should you record one?
Simply put, a voiceover is someone speaking over a video even though they are not directly in the scene, usually. That’s the obvious bit out of the way.
But whether you’re commentating on a recorded stream or simply explaining the context behind a slideshow of pictures, a well-tuned voiceover can be highly effective.
In the kindest way possible, the viewer may not always want to watch a ten-minute video of you talking to your screen. Buy they may also get a bit confused when watching some gameplay or tutorial that you’ve recorded if there is no narrative offered through vocal explanation.
Therefore, a voiceover is a nifty way of making sure your audience absorbs the information you intended to provide, if they may otherwise have missed it.
The best bit? In 2018 anyone can accomplish a decent voiceover, even from the comfort of home, thanks to improvements in microphones, computer tech and audio equipment.
Planning a voiceover but not too sure where to start?
As ever, it’s best to begin with the basics. Though some YouTubers like to record their audio spontaneously and overlay it on their video content at the first time of asking, a more systematic approach is no bad thing.
Obviously get to know your video content very well, view that YouTube video several times. You may even decide to design a script, once you know how long you have to talk, to prompt you responding to any visual cues. Of course, you may decide to be flexible when actually recording, but it never hurts knowing the points you want to make. It should stop you umm-ing and ahh-ing too.
Once you’ve decided what you want to comment on, and what tone you wish to adopt, you’re almost ready to get cracking. However, it is also advisable to source a good microphone for recording – we’ll get on to editing software later. Many laptops will have a built-in mic, but many YouTubers and commentators prefer to upgrade and source their own.
Hit record!
This is the exciting bit – you’re ready to go! That is assuming that you’ve downloaded a decent app to record sound on your PC.
GiliSoft Audio Recorder Pro
– enables you to record audio from any internal or external source, like a soundcard or your mic, without loss in quality. It can then be directly saved in several formats, including .MP3, .WMA and .WAV.
Other key features of GiliSoft Audio Recorder Pro:
- Pre-define audio recording qualities.
- Silence detection (Voice activation).
- Schedule your recordings.
- Preview sound recording device before record.
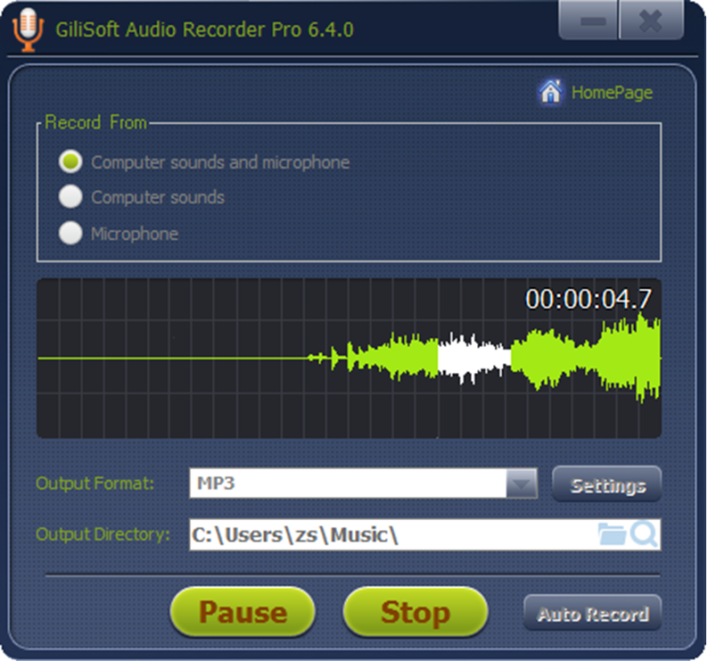
Gilisoft Audio Recorder Pro

Comments
Post a Comment